
Infrared Nikon D90 with 18-105 AF-s in infrared
October 26, 2008 © Jim Chen
Announced in August, shipped in September, Nikon D90 is the state of the art DX format SLR camera. It replaces the D80, and let its big brothers D300 and D3 run for the money. It has a new 12.3 MP extreme low noise CMOS sensor, a 3-inch sharp LCD, and live view. Did I mention the 1280 x 720 p, 24 frame/s hi-definition video! Please see the wonderful review and user guide of the normal operation at Ken’s site.
Now D90 is gone infrared.
Overall IR Performance

Which one?
Spanish Village, Balboa Park, October 26, 2008
Nikon D90IR, 18-105 AF-s VR kit lens
@ 80mm, 1/350s, f9.5, ISO200, B/W mode
After the internal UV-IR blocking filter is replaced with an IR filter, the 12.3 MP CMOS sensor offers extremely clean images at a sensitivity similar to color photography. More than great for landscape, together with a VR lens, it is the ultimate "street-sweeper". The large and bright viewfinder makes taking photo a pure joy. And the 3-inch “articulate” LCD feeds back with instant satisfaction.
White Balance
As usual, I white-balanced it with a patch of grass under direct sun at noon. I first choose the "pre" white-balance mode, then set the exposure at "-2" by pressing the +/- button and turn the wheel. Then I press and hold the WB button in the back until the "Pre" flashes in the top LCD. I then fire a shot at a patch of grass, and the camera says "good" on the top LCD. Take a image at the same setting and save it for later as WB reference. Then I change the exposure to normal, done!
Resolution
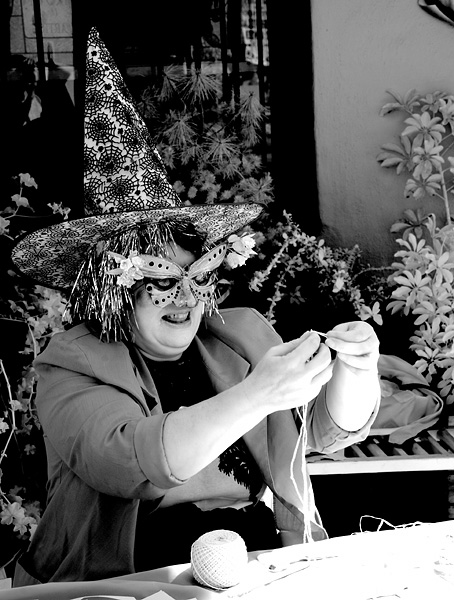
Time to sew you up
Pre-Halloween Show, Balboa Park
Nikon D90IR, lens: what I have in hand
Av: what is left in the camera, Tv: a split of second when I saw her
The resolution is great. Click here for the 100% pixel-peeping (original crop, no sharpening applied, slightly curve applied) of her face. I have no idea what she did to herself. She was not that bad in daylight. If I saw her in IR, I would have dropped my D90IR.
Shooting Mode

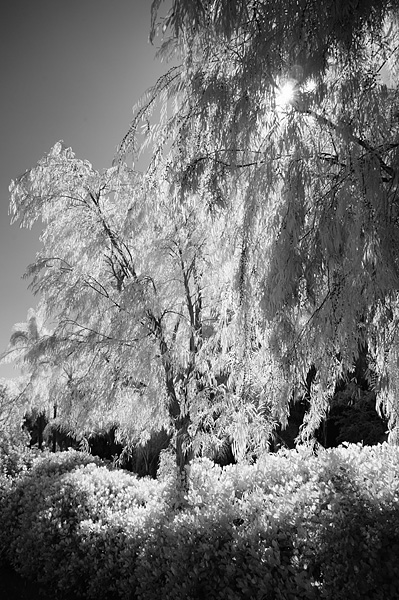
My Brick Wall for IR
All-Wood Botanical Building, Balboa Park
Nikon D90IR, Planar 1,4/50 ZF
@ 1/350s, f 5.6, ISO200
The D90 offer 6 presets in Nikon Picture Controls (in the shooting menu, the camera icon). The parameters such as Sharpening, Contrast, Brightness, Saturation, and Hue can be adjusted and saved. I found that most of the time, I use the Standard and Monochrome mode. The Standard keeps some sepia color cast, which can be used to create the “IR” blue sky by blue-red channel swap.
Veil
Nikon D90IR, 18-105 AF-s VR kit lens
@ 21mm 1/125s, f11, ISO200, B/W mode
I sometime like the monochrome. It removes any residue color in camera right away. In September, 2008, when attending a photo workshop at Catalina Island organized by a major photo manufacturer, I run into a wedding without paid photographers at the beach. I, together with my friends, volunteered to shoot for them, and email them photos for free. All I have with me was an infrared camera. And the images in B/W mode were surreally romantic, thus my called it Romantic Mode.
The original Nikon Picture Controls, of course, is not designed for infrared images. I sometime found that, with just a little play with the curve in the photoshop, it instantly make the infrared images a lot more punchy. It is not much effort to individually adjust couple of dozens to my taste. I enjoyed it with my coffee, or sleepless night.
But, how can I get away with 24 images per second video?
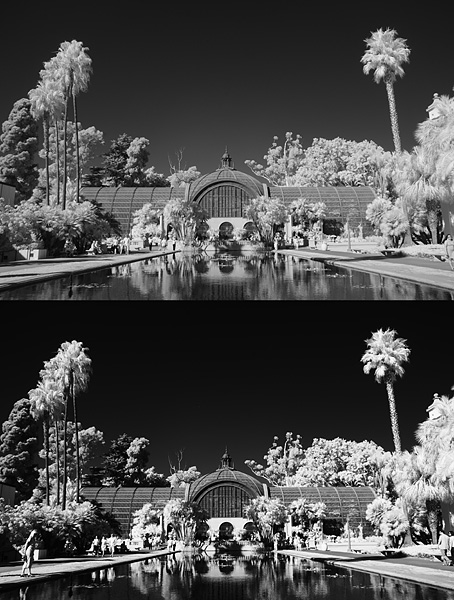
Isn't curve more attractive?
Top, factory monochrome preset straight no curve
Bottom, custom S curve optimized in computer then loaded to camera
Nikon D90IR, all other parameters are same, no curve adjusted in processing
The magic Custom Picture Controls! I first set the S-curve that I liked (or, based on my experience of dozens of thousands of infrared photos that I took) in the Picture Control Utility software (in the ViewNX that come in the D90 box), then let the camera apply it to all the images. And we have a total of nine custom presets! Here is an easy way: Simply, I save a factory preset as custom presets, then export them to the memory card. Then import to ViewNX to modify the “S” curve, and export it to the memory card, then upload to the camera. To my delight, it works on the video!
720p / 24 Video
It is great in IR. Unfortunately, due to limited bandwidth, I can not give you the evidence right now, right here. The data stream is so huge, it will chock the “hi-speed” USB 2. The fire wire (1394) seems good enough between my Mac and an external harddisk. I will put some footages on youtube, but it will never do the justice for the resolution: it is 2 MB a second.
For video, as you might have read elsewhere, it is not perfect. The weakness that concerns me are: no manual controls over aperture, shutter and ISO. Basically, when it goes to video mode, it is its own boss. I wish it apply the setting from the still photo to the video, with some auto-ISO if the shutter speed is too slow. Anyway, for the video of DOF, and the sensitivity, on a great SLR camera, it is very well worth it.
Here are my few tips so far:
1) Set the “curve” in a preset as mentioned above. Better yet, save couple of presets. Try the presets with a still images to see which one you like better before go to video mode.
2) Assign the AE-L/AF-L button to AE lock (hold). After you are happy with the exposure, lock the exposure. Because, if it is unlocked, the camera has its own brain to determine the exposure. A white fluffy puppy comes into the viewfinder can distract the 3d-Matrix. It really flicks.
3) Use manual aperture lens to control DOF. Yeah, the AI-s lens are great, you need to use the M mode though. I put a masking tape on the focus ring, and focus to couple of point that I might pause during the shooting, and mark on the focus on the masking tape before I start to shoot. When I pan, I smoothly rotate the ring and stop at the point I marked.
4) Tripod = no earthquake-cam.
I need to get out to shoot and figure more before I can write more, otherwise I will get some blisters on where I sit.
Happy Shooting, if you figure out more, or want to know more, please shoot me an email.
This is Infrared Jim, till next time...